

How To Begin Doing Your Own Acrylic Nails
Function 1 : Purchase Acrylic Nails Supplies
This is not just a quick tutorial only a very comprehensive detailed stride by step guide for how to do acrylic nails yourself at dwelling.
We will cover every tiny detail you demand to know to practice your own acrylic nails without the need of any professional guiding you. Afterwards you finish going through, you volition notice yourself having the same knowledge equally an expert and may even want to offer the aforementioned service to your friends. No i am not joking, I hateful what i but said!
This guide will be divided into unlike parts. First nosotros need to collect all the supplies required to do acrylic nails at dwelling.
OPTION ane : Acrylic Nails Starter Kit (yep Optional non recommended)
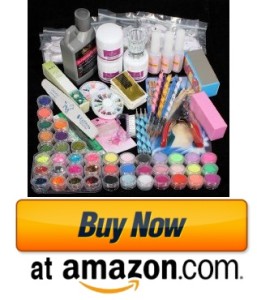
This is the best kit yous can buy if you want to. Look for no other.
Why not recommended? It will exist a practiced bargain than buying all supplies separately. So just if you are low on budget and so I would recommend going for starter kit just delight notice that the quality of the products is not very practiced in these starter kits.
If you do not want to compromise with quality , please stay abroad from the starter kits and instead spend some more coin to buy the best quality acrylics nails supplies separately. In the long run, they volition be much better, healthy and besides cheaper.
I have done a deep research to notice the best blast supplies you can buy without giving a second idea. My recommendations are backed with hundreds of reviews by happy customers and these are the best brands you tin go at fair pricing.
Here goes the complete list of all supplies yous need before we get started:
Recommended Best Acrylic Nails Supplies
ane. Acrylic Blast Tips

These are white tips, you lot tin go for natural color, pink or whatsoever other y'all want. There are enough of colors and designs. Just click on higher up image and you will find lots to cull from. Select as per your want.
two. Boom Glue

Yes this i is the best mucilage for applying tips on your nails. Don't go with the inexpensive ones if you want your acrylics to stick on your nails for a long time.
3. Acrylic Nail Clipper

Certainly one of the best smash clippers out there for your acrylic nails related jobs.
4. Blast File

This is a pretty proficient file that does information technology job really well. You lot may want to consider an electric file kit if you want a faster culling. Await at the 6th option.
5. Nail Buffer

This is a good one you want to accept for all your nail buffering requirements. Once more if you desire, purchase an electric kit instead which does both filing and buffer. Wait at the next option.
6. Electrical File Buffer Kit (Recommended)

This is a good quality electric nail kit for filing and buffering. This is actually skillful product for the beginners. Complete value for money.
7. Acrylic Liquid

You may desire to buy bigger volume to go truthful value for money. Regarding quality, do not worry every bit this product has stood the test of time.
viii. Acrylic Powder

No this isn't something likewise expensive simply also not some cheap quality. This is the most popular acrylic nail powder which you can't go incorrect with.
9. Acrylic Dish

I simply dear this i. Its so lovely and elegant. This ain't non very plush too, just get and buy few of them.
ten. Acrylic Brush

You must buy a good quality smash castor for authentic application. This is one of the virtually popular product and fail proof.
11. Acetone Smash Shine Remover

Comes from a trusted make. Nothing more is needed to be said for this astonishing smash polish remover. Its recommended to use acetone based remover only. Regular removers practice not work for this job.
12. Nail Primer

Their products are ever high quality. Quality is second to none. Merely go for it, you won't regret.
13. Cuticle Stick

This cuticle stick is pretty good product. It has a safe edge and is really long lasting. I propose buying one. You lot volition go true value for every penny spent on it.
14. Nail Dust Remover

Looks as well beautiful, isn't it? Aye yous would want to clean your nail once again & over again with this soft brush.
fifteen. Lint free Cotton Pads

These cotton wool pads are really crawly to be honest. Hundreds of reviews vouch for the quality. You tin can use other soft cotton fiber textile or other stuff as well. But if you want to buy then these are the best option.
Phew!! Finally, if you have all the to a higher place supplies with you lot, your arsenal for doing acrylic nails at your domicile should be fully equipped. You can buy them at your local store likewise simply i have paw picked the best and tested supplies which always piece of work up to expectations.
Let's move on to the next part of this tutorial.
Office 2 : Preparing the Nails
STEP 1 : Removing onetime Nail Pigment
- First you need to clean your nails properly. Launder your hands with soap and h2o thoroughly.
- Cover the surface with a waste material cloth or paper towel.
- Now utilize the nail smooth remover to take off the former nail paint you accept on your nails.
- TIP : Its suggested to employ round circular moves to have off the paint, its much easier that manner.
- NOTE : I highly recommend to utilize a acetone based boom smooth remover to make sure you get complete make clean nail bed otherwise its going to give trouble at later stage.
- If you already take acrylics nails, and so you must follow the proper method to remove them kickoff. Please follow our tutorial here: How to Remove Acrylic Nails at Domicile
STEP two : Trim & File
- Now its fourth dimension to do some trimming. Take a good quality blast clipper to trim your nails shorter simply not too short that you deceit manage them. You tin use boom scissors likewise for the job.
- Then you want to file them using a soft file (not coarse), this is to exist done so that the surface becomes more crude and viscous. It helps the acrylics to stick much stronger to your nails.
Footstep 3 : Working with Cuticles
- Now apply cuticle remover on your cuticles. Its highly recommended. It do comes along with starter kit too or you can purchase the i suggested above.
- Take a cuticle stick or pusher and button all the 10 cuticles one past one backwards.
- Remove any expressionless tissue yous see otherwise they will human activity as blockage while applying acrylics.
- WARNING: Do not try to trim living tissue equally that may lead to septic and ordinarily they grow back and fifty-fifty more thicker which may just be another problem. That is why you lot should apply cuticle remover.
- TIP: Before applying cuticle remover, you may want to dip your nails in hot water as that makes them more soft to piece of work with and near painless process.

Pace four : Apply Smash Primer
- The next step is to make your nails dry and removes any oil left on your nails. This helps the acrylics to stick better otherwise oil won't let it become in contact with the blast bed the mode we want.
- You demand to employ recommended nail primer just for this purpose.
- Apply blast primer with the help of cotton bud on your nail and rub it.
- WARNING: Practise not let your skin come up in contact with boom primer because it is acidic and may cause burns. If you are using the one recommended past me, that is acid costless.
- TIP: Do non overuse it.

That's information technology, we are washed with the 2d stage of doing acrylic nails at habitation. At present, let'south proceed to third stage!
PART 3 : How to Utilize the Acrylics
Step 1 : Clean the filings
- If you lot purchased the kit, you must be having a nail cleanser too along with a lint free wipe.
- Employ some cleaner on your nail with the aid of the wipe. This helps to ensure that there isn't any residue left on the boom.
- TIP: If your kit does not contain the cleanser, you tin can use the substitute "Pure Acetone" equally well. Do non apply acetone based polish remover equally that won't help here.
STEP 2 : Selecting the Tips
- You need to find the right size of tips for your nails. What exactly is the right size?
- The tips which fits perfectly on both sides of your smash is the right size but definitely ready made tips won't perfectly fit you.
- You lot will find the tips which are either short or little actress in size. Which one to choose?
- Always go with the ane which is bigger than your smash width and and then file it to the correct size using a nail filer and buffer.
- Y'all must not forcefully fit the shorter tip on your nail as it may and then lift up later and will continue pinching you.
STEP 3 : Apply Glue & Tip
- At present apply some glue on the tip (not on the nail bed).
- Then gently slip the tip down your nail till halfway. Keep it in place holding it for most 30 to 45 seconds.
- TIP: When yous slip the tip and so hold your smash at an bending of 45 degrees to brand certain mucilage doesn't flow downwardly on your finger as it will be then very difficult to remove the dried gum after tip is stock-still.
- TIP: If whatever gum flows around the nail, gently wipe it using the soft nail wipe.
- TIP: If your tip kleptomaniacal while applying, then wash the nail with warm water to brand the tip soft and so remove information technology. Reapply the fresh tip.

STEP four : Preparing Acrylics
- Now have ii separate dishes or ane with 2 divisions. Accept the acrylic liquid in one and acrylic pulverisation in some other dish.
- TIP: Yous definitely want to take the liquid in separate dish every bit directly dipping the castor in the liquid canteen will spoil the whole container and make it unusable for next time.

- Gently dip the tip of the castor into the liquid to make it wet and pull it back sliding it across the dish border to remove excess liquid.
- Quickly dip the moistened tip into the powder and pull it back without taking too much powder.
- Repeat this pace 4-5 times to have an fifty-fifty mixture of liquid and powder on the tip of brush making a small round ball looking similar a bead.
- Making a perfect bead is an fine art at which you keep getting better the more y'all exercise.
- The ratio of liquid and powder should be 40 : threescore respectively. Its just an gauge ratio but our main purpose is to form neither too moisture nor too dry dewdrop.
- If the dewdrop is quite wet so use paper towel to remove the excess liquid.
STEP 5 : Application of Mixture on Nails
- We need to apply the mixture on the complete nail divided into 3 zones.
- Get-go zone starts from down the smiling line till the halfway. Take the bead and employ the acrylic along the grinning line then move the brush in directly move upwards.

- Then utilize acrylic in zone two i.eastward. from halfway till the cease of natural nail gently.
- Finally apply the acrylic in zone 3 i.e. the tip beyond the length of natural smash. Y'all may want to use more acrylic on the edge of the tip where it is glued on the boom in such a mode that border transforms into a gentle gradient.
- TIP: You demand to apply acrylic chop-chop every bit it dries out very fast.
- Accept Intendance: Practise not use acrylic on your pare or cuticle. To attain this, you should leave the offset few mm from the cuticle untouched.
- TIP: While applying if the acrylic isn't spreading freely then dip the brush in liquid once again to make it wet and then try.
- Finally apply the last coat down from the smile line towards end of the tip to form smooth acrylic coating.
- TIP: Try to keep the acrylic coat thicker around the smile line as zone 1 receives the maximum pressure.
STEP 6 : Let the acrylic dry
- Finally, leave your paw however for next eight-x minutes and so acrylic sets and harden.
- Try to test past borer the brush end on the smash. If all went well, then y'all should hear a knocking sound.
- TIP: Do not just leave the brush after yous are done. Clean information technology well with acrylic liquid if you plan to use it the next time or its ruined!
That's it, the hardest part is over. Now just a little finishing touch is required which is covered in the next and final part of this tutorial.
Function 4 : Finishing Touch for the Acrylic Nails
Step 1 : Shaping the Nails
- Trim: First trim down the acrylic nails if required using a fine smash clipper.
- File: Use a fibroid (not soft this fourth dimension) nail file to requite the desired shape to your new acrylic nails.
- Buffer: Apply a good nail buffer to vitrify the nail surface and get in shiny and butter smooth.
- Warning: Do non buffer too close to the cuticle, yous may hurt yourself and yes it hurts a lot!
- If you feel burning sensation during buffering and then only move to the other areas to keep information technology cool.
- Don't be besides crude while filing your new nails. You lot don't want them to pause.

STEP 2 : Fourth dimension to Paint
- Yes get your favorite blast paint and use more than than a few layers on your beautiful acrylic nails.
- Give them a very shiny and smoothen surface that those without acrylics feel similar killing you out of jealousy. ha ha just kidding!
- TIP: Before you apply the smash paint, make certain you clean the nails and remove the leftover grit due to filing with the help of nail duster.
STEP iii : Are we not done already?
Oh yes, we are. 🙂
You will demand to maintain the nails regularly as they will grow in around 14-16 days then you can remove the acrylics or you tin utilise more acrylics as y'all wish.
Please don't feel sad if you didn't get them correct later on your first effort. Call back every first success is preceded by a failed attempt.
If you need any further assist or desire to ask anything most acrylic nails, feel free to contact us or just leave your annotate here.
Sources: google, amazon
Source: https://www.bestacrylicnails.com/tutorials/how-to-do-acrylic-nails-at-home/
Posted by: fossbroweed.blogspot.com
0 Response to "How To Begin Doing Your Own Acrylic Nails"
Post a Comment